|
1. Preamble This section assumes you have a basic knowledge of how to use your paint program. ie. How to recolour images, how to cut and paste portions of images, how to resize portions of images and how to utilise layers to make editing easier. 2. Opening the .DDS file
Locate and open the
77824.DDS
file in Photoshop or Paint Shop Pro (you'll probably need to have added the .DDS plugin as outlined earlier). If you have a scanner you can scan minifigs and clean up the scan and paste into the working .DDS image then position and resize to suit.
You may be able to use custom decals as found on any number of Minifig Custom Decal sites in your skins, but be sure that you have permission from the original artist, and ensure the artist is credited in your file's readme
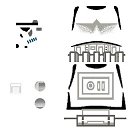
and a link back to their website is provided. 3 . Working example: Turning the STORMTROOPER texture into a TIE PILOT texture Gather reference shots of your minifig if you don't have one in your collection to work from (or other non-LEGO images if it's based on an EU character or something that doesn't have a real LEGO minifig). If appropriate / necessary, make a scan of the minifig to base your design around. Extract the relevant areas from the scan and clean it up by hand, increasing brightness, sharpening lines, adding small details etc
Take the stormtrooper texture. "Negative" it so it's predominantly black. Edit the helmet section, removing most of the decorations, making the eye section a dark grey shade to give it some definition in-game. Even though the actual minifig's eye glasses are the same black as the rest of the helmet, sometimes it pays to forgo 100% accuracy to make the figure more visually interesting in-game. And add an imperial logo above the eye. Edit the back section (I kept the [OII] design on the back to make the figure more interesting, after all you're staring at the back of the character most of the time while playing)
7. Saving the edited file When you're happy with the image and wish to test it in-game, select "Save as". It's a good idea to change the filename slightly from the one you originally started working with or else you'll overwrite the original .DDS file and you'll need to re-extract it if you need to reference it again.
In this case I add a descriptive name to the start of the filename. You must keep the number in the filename as generated when the file was extracted though (in this case 77824) as this is the position in the
.hgp archive where our edited .DDS
file needs to be reinserted.:
|
|||||||||||||||||||||
| |